Wednesday, September 21, 2011

DIY Wedding Seating Chart

My mom, dad, sister, and I helped make the seating chart at our wedding.  All of my family was onboard at this point in the wedding planning because it was getting to be crunch time.  

Here is how we made it:

- I started by taking a very large frame and painted it white.  

- Then I sanded it down to look distressed just like I did for the chalkboard menu frame. 

- My dad cut a large piece of cork board to fit inside the frame. 

 - Then I sprayed an even thin layer of Aleene's Fast Grab Tacky Spray onto the surface of the cork board and gently spread some linen fabric over the front of the cork board being careful not to leave any air bubbles beneath the fabric.

- My sister printed out the title and guests names with a fancy font she found onto some nice card stock paper.  We organized everyone by last name on our seating chart.  I thought it would easier for everyone to find their name this way.  

- My mom found some decorative pins at a hardware store and used them to pin the guests names on the chart.  

- The wooden heart was left over from the table numbers I made so I added a little personal touch by writing onto it with a brown paint pen, "Find Your Table" and stuck it onto the board with the pins.  
  

Tuesday, September 20, 2011

Bridesmaid and Groomsmen Gift Ideas

When Jon and I were researching bridesmaid and groomsmen gifts we had a hard time coming up with something unique and meaningful to give to each member of our wedding party.  We wanted the gifts to be something special and something that they would use after the wedding too.  After looking around quite a bit, here is what we came up with.

I gave each of my bridesmaids a turquoise cotton stretchy dress.  I bought them for my bridesmaids to get ready in the day of the wedding since they were comfortable, they slip on and off easily so it wouldn't ruin makeup and hair, they were the same color as our wedding, and they could be worn again.  I bought myself a white one to wear (since I was the bride and the bride always wears white :).  I also gave them their turquoise beaded necklaces they wore in the wedding and the flower hair clips I made for them to wear in the wedding.  

Here is a picture of the girls all in their dresses as we were getting ready.  The dresses were from Target.  :)


Jon gave each of his groomsmen a branding iron and a pair of branded grilling gloves.  Each branding iron was unique because each one had the first initial of each guys last name.  The initial was also branded on the grilling gloves that came with it.  I think it is safe to say that the guys loved their gift!  I mean, what is more manly than grilling a piece of meat?  ;)  Now they get to personalize each piece of steak they grill with their last name initial.  


If you are interested here is a link to the website that we bought them from.  It was perfect because it was a specific package just for groomsmen.  http://www.barbecuebrandingirons.com/pkg_brand_gloves.htm 

If you are interested we also got gifts for our ring bearers, flower girl and guestbook attendant.  For our ring bearers, we gave them each a baseball bat that had their name, the title "Ring Bearer", and our wedding date engraved on it.  I'm pretty sure they love this gift since they are both really into sports.    


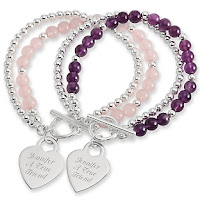
For our flower girl and guestbook attendant we got them each a pretty bracelet with a heart-shaped charm on it with the first initial of their first name.  They looked sort of like these.  


We got the bracelets from an engraving store in our mall called Things Remembered.  Here is a link to the online store.  http://www.thingsremembered.com/

Friday, September 16, 2011

From Wedding Decor to Home Decor

When purchasing items for our wedding I always made sure it would be something I would want to use later for decoration in our house.  Here are some pictures of items that have been taken from wedding decor to home decor.  

Birds and birdcage at our wedding

Birds and birdcage in our home (on our mantle) 

Mason jars and card box (lantern) at our wedding

Mason jars and card box (lantern) in our home

Antique bottles at our wedding

Antique bottles in our home

Tuesday, September 13, 2011

How to Make a Chalkboard Menu

I made a chalkboard menu to display at our wedding so guests could see what they were having for dinner.  Here is how I made it!  :)

First I took an old frame and painted it white.  

Then I roughed it up with sandpaper to make it look weathered.  

Then I sprayed it with some Aleene's Spray Acrylic Sealer so that the frame would be protected.  

After that I took a smooth piece of wood (had my dad cut it down to the right size so that it would fit in the frame) and sprayed it with some Krylon Chalkboard Paint.  


Once it was dry we placed in the frame and wrote down the menu with some white chalk.  There you have it!  

Tuesday, September 6, 2011

DIY Fabric Flower Hair Clips

Today I want to share with you the fabric flower hair clips my sister and I made for my bridesmaids and flower girl to wear at our wedding.  They were really easy to make.  No sewing involved!  We just took several different turquoise patterned fabrics and some ivory tulle and started making them.  Each one was a little unique from the next because we mixed up the fabrics.  If you are interested in making them yourself you can find a great tutorial at Little Miss Momma.  Instead of making the girls headbands to wear, I made hair clips.  I bought some alligator clips and glued one side of the clip in between two pieces of felt.  I think they looked great in the girls hair; it added that extra pop of turquoise color I wanted!  


 Photo credit: Mark Janzen Photography


Friday, September 2, 2011

Our Antique Kitchen Hutch

A little while back Jon and I bought an antique kitchen hutch off Craigslist!  We have an empty space in our kitchen dining area and think it would perfect there.  Of course it will look a lot better with some paint and no more yellow wallpaper on the inside.  Yikes!  I plan on painting it a barn red color and then making it look a little distressed, but my ideas may change.  I am looking forward to working on this once Fall weather rolls around.  I would prefer not to be painting in my garage in triple digit weather!  Anyway, here is a pic of the hutch exactly how we bought it.  I think it has a lot of character.  The man we bought it from said it probably dates back from the 20's or 30's.  Wow!  I will show you how it turns out once I'm done with it.


Tuesday, August 30, 2011

Today is a Cleaning Day

Today is a cleaning day... so I am going to make a quick post so that I can get back to work!

I wanted to show you a picture of the finished wedding arrow sign I made for our wedding. We put it near the ceremony along the pathway to direct guests on where to go. I think it looks really pretty in front of the white roses. If you want to see how I made it click here.

By the way, two days ago marked our three months of being married anniversary. I can't believe that it has already been three months!

Thursday, August 25, 2011

Married Life Update & Honeymoon Pics

I thought I'd check in and let you know how married life is going. You guessed it... it is going swell. :) It's nice to be able to spend a lot of time with my best friend and not have to say goodbye to each other every night anymore. I've gotten into the whole "wifey" routine quite nicely I think, although I may not always enjoy cooking dinner and cleaning the house. ;0)

I just realized I never shared any pictures from our honeymoon on here. Here are several pictures! We stayed at the Sandals resort in Antiqua (a small island in the Caribbean) and it was absolutely beautiful! We had an amazing time. I wish we were still there.

Tuesday, August 23, 2011

Wooden Heart Table Numbers

Today I want to share with you the table numbers I made for our wedding! Very simple and easy to do and it added that unique homemade touch.

I bought some wooden hearts, number stencils, a craft sponge and brown craft paint from Michaels.

After I finished sponging the numbers on the hearts, I let them dry. Then I took the hearts outside and sprayed them with Aleene's Spray Acrylic Sealer to protect them so that no moisture would ruin them. Once they were dry I had my dad drill two holes at the top and we tied twine through each hole and tied them on the table centerpieces.

Here is a table number hanging on one of the white iron centerpieces.

We also hung them from the mason jar centerpieces too.

Thursday, August 18, 2011

Starting Out Small

Time for a new post! I know... I am really overdue! Stay with me folks, I hope to get more consistent again. One reason that I haven't been blogging is that I'm really busy (but who isn't?). My other reason is that whenever I think about blogging I just get so overwhelmed thinking about everything I need to catch up on since I went MIA on here a couple months before the wedding. Ok, enough excuses!!

Today I decided to get on here and start out small. That's why I decided to show you the LOVE mugs I talked about awhile back. Here is a picture of them with the flowers in them on our guest book table. Don't they look fabulous?! I just loved them! Special thanks to our amazing florist, Amy Degraw, with Brown Bunny Flowers. She is wonderful! If you are local and are looking for a wedding florist, I definitely recommend her!

Photo cred to my friend Alexa Westerfield of Swell Life Studios

Thursday, June 30, 2011

I'm a Married Woman Now!

Wow!!! I cannot believe it's been over two months since I last blogged! Sorry I couldn't keep up before, I just got soooooo busy with wedding planning towards the end that I just couldn't find the time to blog. So that means I have a lot to catch up on....

Well for starters.... I am married now!!!!!! I am loving married life. My husband is such a wonderful man and I am incredibly blessed to be his wife. Our wedding was everything I dreamed of and more. The day went smoothly and it all turned out so beautiful. The weather was great except for a little rain towards the end of the evening, but we were under cover so it didn't matter. Everything was perfect and I have pictures to show for it. Here are a few of my favorites. I will be sharing more with you later (especially the ones of my DIY touches to the wedding). :)


Thursday, April 28, 2011

1 MONTH for Us... 1 DAY for Will & Kate

I've got lots to share... life is busy, but good!
2 weekends ago I had my bachelorette party! We had a lot of fun at the coast wine tasting and hanging out at the beach. I will post some pics once I get them from my sister. :)

Last weekend Jon and I flew to Michigan with his brother, sister-in-law, and sister for their grandmothers funeral. It was a sad time but also a joyous time because she is now pain free and in heaven with our savior, Jesus Christ. It was nice because we got to spend Easter with Jon's family which we wouldn't have otherwise. We got back really late Tuesday night so I've spent the rest of this week recovering from jet lag and doing laundry, etc.

Also----- Today is a big day for Jon and I because we are now officially one month away from getting married!!! My, how the time has flown. I know this month will go by especially fast. I'm starting to feel pretty overwhelmed because of all the things I still need to do before the wedding. My to do list is daunting. I know it will all get done though and I just need to take it one step at a time.

Well- that's it for now.... I will be hopefully showing you some more projects I've been working on soon.

Oh, and I am looking forward to watching the royal wedding! You better believe I have my DVR set to record it tonight/tomorrow morning! I'm excited to see what her dress and everything else looks like. :)

Thursday, April 14, 2011

Another Fun Bridal Shower and a Trip to San Fran

I wanted to share with you another cute and fun bridal shower of mine that I had two weeks ago. :0) I had a great time and felt so blessed to have such a wonderful family. Thank you to those of you that came and to my aunt and cousin for throwing a great shower!

My cousin Kristen made these adorable cupcakes. I loved that she wrote, "Best Wishes Mandy" on them. They were delicious.
This little advice tree was really creative. Each guest wrote some words of wisdom for marriage and hung it on this metal tree. Everyone also came with a favorite recipe and put it in a box for me to take home. I have all kinds of great recipes that I can't wait to start cooking now!
I thought this was very cute too. Everyone got to take a little bag with them home that had Hershey's hugs and kisses inside.
And here is a picture of me with the party planners... my Aunt Janice, Cousin Kimberly, and Cousin Kristen.

Last weekend Jon and I went to San Francisco to visit my sister, Chelsie, and Jon's sister, Maria, who are roommates in the city. How ironic is that?! It's pretty awesome if you ask me. :) Anyway we had a great time visiting them. Some highlights... we walked through Golden Gate park, went to Buca Di Beppo for dinner, went to Cheesecake Factory overlooking the city, Sunday morning went to church at Reality, had a delicious omelette at Squat and Gobble, and stopped for cookies at Hot Cookie located in Castro (pretty interesting place, that's all I have to say about that!).

Here are some photos from the weekend :)